


背景: v2ray的vmess本身是一款稳定、安全的协议,在稳定安全的基础上,大家还会对速度和性能有更高的追求。在此背景下,诞生了Trojan及vless之类的协议,vless的实现思想和trojan类似。而xray是在v2ray-core的基础上实现了vmess和vless的功能合集,而且还增加对xtls的支持。
像trojan的设计是直接使用HTTPS通信,会占用443端口,如果你的VPS服务器除了科学上网工具,还同时搭建了网站的话,这就会产生冲突。
今天这个xray的搭建教程,是通过SNI回落的方式,来实现将xray的vless使用443端口,作为统一的网络通信入口。80端口会跳转到443端口。然后通过SNI回落,来将不同域名及协议进行分流:也就是vmess协议的流量,会回落到vmess的监听端口;网站对应的域名,会回落到网站对应的端口地址。从而实现vless、vmess、网站共存,443端口复用的目的。
结果预期:
- 可实现vless协议的代理服务;
- 可实现vmess协议的代理服务;
- 可通过443端口来实现网站服务的正常访问;
接下来开始正文。
正文开始之前,先插播个广告,推荐一些性价比较高的VPS,有购买VPS打算的,可以使用我的推介链接,这样你不仅可以优惠购买,我也会得到一定的返券,感谢你对我写文创作的支持!没有购买VPS打算的,可以跳过这一部分。
一、搬瓦工VPS推荐
速度、性价比都较好: 老牌商家,一分价钱一分货,套餐选择上肯定是越好的越贵,选择适合自己的,但从速度上来说,VPS 速度:香港线路 > CN2 GIA 线路 > CN2 线路 > 普通线路。搬瓦工优惠券: BWH3HYATVBJW,此券为全网当前最高优惠力度:6.58%。
| 线路 | CPU | 内存 | 硬盘 | 带宽 | 流量 | 价格 | 购买链接 |
|---|---|---|---|---|---|---|---|
| CN2(推荐) | 1x Intel Xeon | 1024 MB | 20 GB SSD | 1 Gbps | 1 TB/月 | $49.99/年 | 购买 |
| CN2 GIA(特别推荐) | 2x Intel Xeon | 1 GB | 20GB SSD | 2.5 Gbps | 1000GB/月 | $169.99/年 | 购买 |
| CN2 GIA(特别推荐) | 3x Intel Xeon | 2GB | 40G SSD | 2.5Gbps | 2000GB/月 | $299.99/年 | 购买 |
| CN2 GIA(推荐) | 4x Intel Xeon | 4 GB | 80 GB SSD | 2.5 Gbps | 3000GB/月 | $549.99/年 | 购买 |
| CN2(推荐) | 1x Intel Xeon | 2048 MB | 40 GB SSD | 1 Gbps | 2 TB/月 | $99.99美元/年 | 购买 |
| 常规 | 2x Intel Xeon | 1024MB | 20 GB SSD | 1 Gbps | 1 TB/月 | $49.99/年 | 购买 |
| 促销 | 4x Intel Xeon | 4GB | 80GB SSD | 1 Gbps | 3TB/月 | $199.99/年 | 购买 |
| 促销 | 3x Intel Xeon | 2 GB | 40 GB SSD | 1 Gbps | 2 TB/月 | $99.99/年 | 购买 |
二、Rackerd VPS推荐
性价比较高: 提供大流量、大硬盘,支持PayPal、支付宝、微信等多种付款方式,电信走CN2 GT,联通直达机房(极佳),移动强制走联通链路,算是非CN2线路之外优化的相当不错的。
| 内存 | CPU | SSD | 流量 | 价格 | 购买 |
|---|---|---|---|---|---|
| 768MB | 1核 | 12GB | 1T/月 | $10.88/年 | 链接 |
| 2G | 2核 | 35GB | 4T/月 | $24.98/年 | 链接 |
| 3GB | 3核 | 45GB | 6.5T/月 | $24.28/年 | 链接 |
更多可选超高性价比套餐参见:Racknerd VPS套餐。
三、OLVPS VPS推荐
便宜、低价: 入门级KVM VPS推荐,OLVPS成立于2018年,走的是性价比路线,支持支付宝付款,适合新手。
| 内存 | CPU | 硬盘 | 流量 | 价格 | 购买 |
|---|---|---|---|---|---|
| 384MB | 1核 | 5GB | 512GB/月 | ¥8/月 | 链接 |
| 768MB | 2核 | 5GB | 1T/月 | ¥15/月 | 链接 |
| 1GB | 3核 | 20GB | 2T/月 | ¥30/月 | 链接 |
更多可选超高性价比套餐参见:OLVPS VPS 套餐。
四、搭建脚本说明
使用到的安装脚本,是xray社区的官方脚本:https://github.com/XTLS/Xray-install; 该脚本在执行时会提供info和error 等信息,请仔细查看执行过程中打印的信息。
简要使用:
- 安装和更新xray-core及geodata
bash -c "$(curl -L https://github.com/XTLS/Xray-install/raw/main/install-release.sh)" @ install -u root
- 只安装xray-core,不安装geodata
// 只更新 .dat 資料檔
bash -c "$(curl -L https://github.com/XTLS/Xray-install/raw/main/install-release.sh)" @ install --without-geodata
- 移除/卸载xray
# bash -c "$(curl -L https://github.com/XTLS/Xray-install/raw/main/install-release.sh)" @ remove --purge
五、环境信息
- 系统:Debian GNU/Linux 10
- 这里使用的root用户
- xray-core版本:v1.5.4,地址:https://github.com/XTLS/Xray-core/releases ;
- v2rayN:5.9,地址:https://github.com/2dust/v2rayN/releases ;
六、开始搭建
下面我搭建过程中涉及的域名your-domain.com,请在实际执行过程中,换成你自己的域名。
6.1 连接VPS
这篇文章里有使用xshell远程连接VPS的细节。
6.2 更新VPS环境
apt update
6.3 安装curl
apt install -y curl
6.4 安装xray
使用curl进行安装
bash -c "$(curl -L https://github.com/XTLS/Xray-install/raw/main/install-release.sh)" @ install -u root
上面的脚本执行日志的细节如下:
root@racknerd-2092ac:~# bash -c "$(curl -L https://github.com/XTLS/Xray-install/raw/main/install-release.sh)" @ install -u root
  % Total    % Received % Xferd  Average Speed   Time    Time     Time  Current
                                 Dload  Upload   Total   Spent    Left  Speed
100   141  100   141    0     0   1226      0 --:--:-- --:--:-- --:--:--  1226
100 29581  100 29581    0     0  98933      0 --:--:-- --:--:-- --:--:-- 98933
info: Installing Xray v1.5.4 for x86_64
Reading package lists... Done
Building dependency tree... Done
Reading state information... Done
Suggested packages:
  zip
The following NEW packages will be installed:
  unzip
0 upgraded, 1 newly installed, 0 to remove and 74 not upgraded.
Need to get 171 kB of archives.
After this operation, 394 kB of additional disk space will be used.
Get:1 http://ftp.us.debian.org/debian bullseye/main amd64 unzip amd64 6.0-26 [171 kB]
Fetched 171 kB in 0s (451 kB/s)
Selecting previously unselected package unzip.
(Reading database ... 27963 files and directories currently installed.)
Preparing to unpack .../unzip_6.0-26_amd64.deb ...
Unpacking unzip (6.0-26) ...
Setting up unzip (6.0-26) ...
Processing triggers for mailcap (3.69) ...
Processing triggers for man-db (2.9.4-2) ...
info: unzip is installed.
Downloading Xray archive: https://github.com/XTLS/Xray-core/releases/download/v1.5.4/Xray-linux-64.zip
  % Total    % Received % Xferd  Average Speed   Time    Time     Time  Current
                                 Dload  Upload   Total   Spent    Left  Speed
100   656  100   656    0     0   2420      0 --:--:-- --:--:-- --:--:--  2429
100 9703k  100 9703k    0     0  6260k      0  0:00:01  0:00:01 --:--:-- 9985k
info: Extract the Xray package to /tmp/tmp.VGDYskiu7y and prepare it for installation.
rm: cannot remove '/etc/systemd/system/xray.service.d/10-donot_touch_multi_conf.conf': No such file or directory
rm: cannot remove '/etc/systemd/system/[email protected]/10-donot_touch_multi_conf.conf': No such file or directory
info: Systemd service files have been installed successfully!
warning: The following are the actual parameters for the xray service startup.
warning: Please make sure the configuration file path is correctly set.
# /etc/systemd/system/xray.service
[Unit]
Description=Xray Service
Documentation=https://github.com/xtls
After=network.target nss-lookup.target

[Service]
User=root
#CapabilityBoundingSet=CAP_NET_ADMIN CAP_NET_BIND_SERVICE
#AmbientCapabilities=CAP_NET_ADMIN CAP_NET_BIND_SERVICE
#NoNewPrivileges=true
ExecStart=/usr/local/bin/xray run -config /usr/local/etc/xray/config.json
Restart=on-failure
RestartPreventExitStatus=23
LimitNPROC=10000
LimitNOFILE=1000000

[Install]
WantedBy=multi-user.target

# /etc/systemd/system/xray.service.d/10-donot_touch_single_conf.conf
# In case you have a good reason to do so, duplicate this file in the same directory and make your customizes there.
# Or all changes you made will be lost!  # Refer: https://www.freedesktop.org/software/systemd/man/systemd.unit.html
[Service]
ExecStart=
ExecStart=/usr/local/bin/xray run -config /usr/local/etc/xray/config.json

installed: /usr/local/bin/xray
installed: /usr/local/share/xray/geoip.dat
installed: /usr/local/share/xray/geosite.dat
installed: /usr/local/etc/xray/config.json
installed: /var/log/xray/
installed: /var/log/xray/access.log
installed: /var/log/xray/error.log
installed: /etc/systemd/system/xray.service
installed: /etc/systemd/system/[email protected]
removed: /tmp/tmp.VGDYskiu7y
info: Xray v1.5.4 is installed.
You may need to execute a command to remove dependent software: apt purge curl unzip
Created symlink /etc/systemd/system/multi-user.target.wants/xray.service → /etc/systemd/system/xray.service.
info: Enable and start the Xray service
从日志里,我们可以看到安装使用的配置文件信息:/usr/local/etc/xray/config.json。
6.5 安装nginx
执行安装
apt install -y nginx
新建网页目录
这里在假设是/root/www。
mkdir -p /root/www
新建首页
在/root/www目录下新建一个index.html文件,
vi /root/www/index.html
内容如下:
<html>
   <title>欢迎访问四个空格</title>
   <head><meta charset="UTF-8"></head>
   <body>
     <a href="https://www.4spaces.org/install-v2ray-v-4-44-on-debian-2022/">四个空格</a>
   </body>
</html>
新建配置文件
注: 不同版本的nginx配置文件可能有区别,我的是nginx/1.18.0,配置文件/etc/nginx/sites-enabled/default。或者你的配置文件可能在/etc/nginx/conf.d/default.conf。
输入vi /etc/nginx/sites-enabled/default命令,编辑nginx配置文件为如下内容:
server{
    listen 80;
    server_name www.your-domain.com your-domain.com blog.your-domain.com;
    index index.html;
    root /root/www/;
}
这里你可能需要将
/etc/nginx/nginx.conf中第一行user www-data改为user root,即当前用户。
启动nginx服务
#启动Nginx并设置为开机自启
systemctl start nginx;systemctl enable nginx

#查看nginx启动状态
systemctl status nginx
说明:配置文件中,www.your-domain.com 、your-domain.com作为网站域名使用,通过443端口作为入口,在xray回落配置里,域名分流指向网站目录。而blog.your-domain.com是根据vmess协议分流到代理服务端口。
在浏览器里访问your-domain.com,如果正常则说明nginx配置没问题,这是是没有加密的,不带HTTPS的网址:http://www.your-domain.com。
6.6 安装certbot并申请ssl证书
详细的申请证书流程参考: certbot instructions – Nginx on Debian 10 (buster)。具体如下:
安装snapd
apt install -y snapd
确保snapd为最新版本
snap install core; snap refresh core
安装certbot
snap install --classic certbot
创建软链
ln -s /snap/bin/certbot /usr/bin/certbot
申请证书
运行certbot --nginx开始申请证书,申请时,选择为多个域名申请证书时,各域名对应数字用英文逗号或空格分隔,如下:
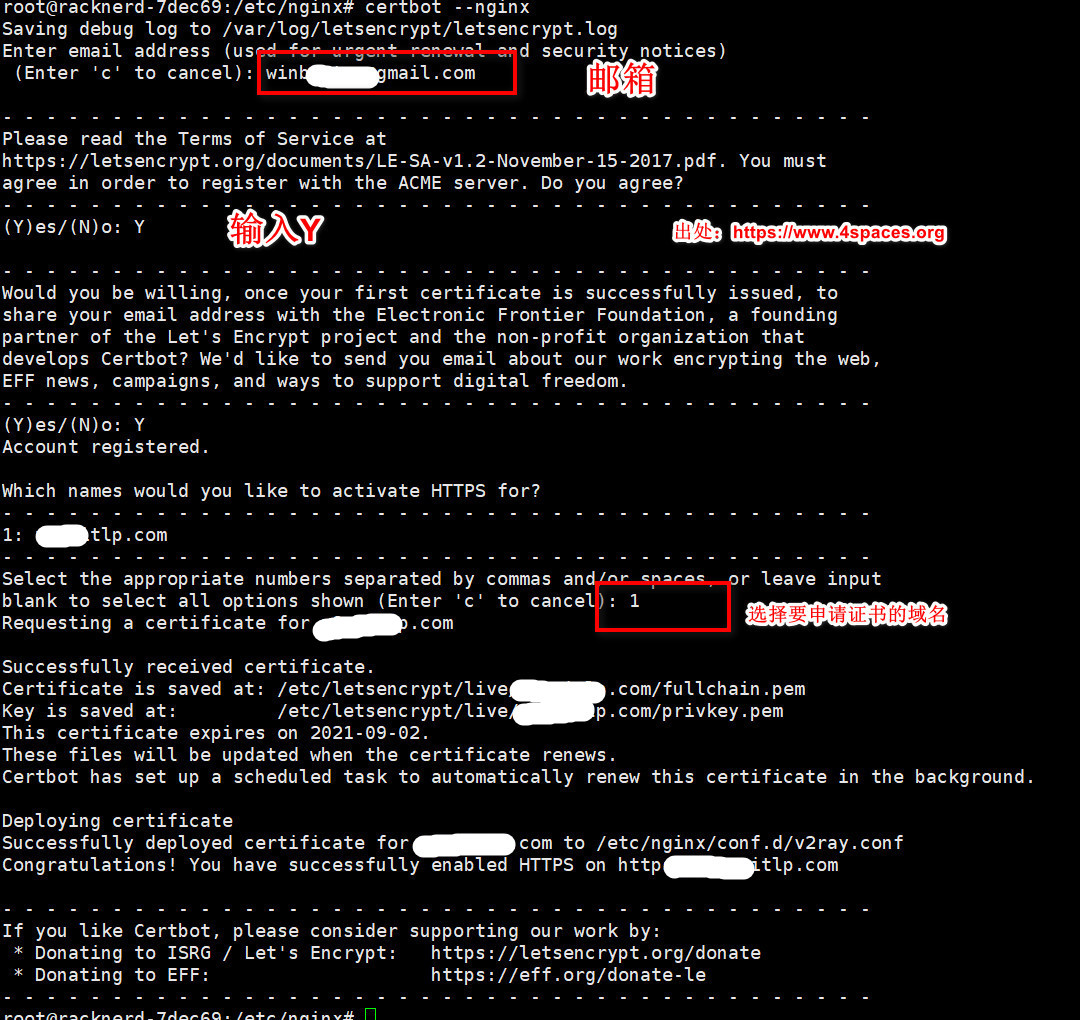
如上图,执行过程中出现Successfully received certificate表示获取证书成功,并显示了证书的保存路径。
Successfully received certificate.
Certificate is saved at: /etc/letsencrypt/live/your-domain/fullchain.pem
Key is saved at:         /etc/letsencrypt/live/your-domain/privkey.pem
This certificate expires on 2022-07-20.
6.7 更改Nginx和xray配置文件信息
xray配置
将/usr/local/etc/xray/config.json更改为以下内容:
{
    "log": {
        "loglevel": "warning",
    "access": "/var/log/xray/access.log",
        "error": "/var/log/xray/error.log"
    },
    "inbounds": [{
            "port": 443,
            "protocol": "vless",
            "settings": {
                "clients": [{
                        "id": "e2b89a7a-6a6b-47f1-9e17-09c6d1e5a746",
                        "flow": "xtls-rprx-direct"
                    }
                ],
                "decryption": "none",
                "fallbacks": [{
                        "name": "blog.your-domain.com",
                        "path": "/vmessws",
                        "dest": 6000,
                        "xver": 1
                    }, {
                        "dest": 6001,
                        "xver": 1
                    }, {
                        "alpn": "h2",
                        "dest": 6002,
                        "xver": 1
                    }, {
                        "name": "your-domain.com",
                        "dest": 6003,
                        "xver": 1
                    }, {
                        "name": "your-domain.com",
                        "alpn": "h2",
                        "dest": 6004,
                        "xver": 1
                    }
                ]
            },
            "streamSettings": {
                "network": "tcp",
                "security": "xtls",
                "xtlsSettings": {
                    "alpn": [
                        "h2",
                        "http/1.1"
                    ],
                    "certificates": [{
                            "certificateFile": "/etc/letsencrypt/live/your-domain.com/fullchain.pem",
                            "keyFile": "/etc/letsencrypt/live/your-domain.com/privkey.pem"
                        }
                    ]
                }
            }
        }, {
            "port": 6000,
            "listen": "127.0.0.1",
            "protocol": "vmess",
            "settings": {
                "clients": [{
                        "id": "2f726dac-6a7a-430d-8870-fb5634cf500c"
                    }
                ]
            },
            "streamSettings": {
                "network": "ws",
                "wsSettings": {
                    "acceptProxyProtocol": true,
                    "path": "/vmessws"
                }
            }
        }
    ],
    "outbounds": [{
            "protocol": "freedom"
        }
    ]
}
将上面的域名换成自己的域名。
nginx配置
配置文件/etc/nginx/site-enabled/default:
set_real_ip_from 127.0.0.1;
real_ip_header proxy_protocol;


server {
    listen 127.0.0.1:6001 proxy_protocol default_server;
    listen 127.0.0.1:6002 proxy_protocol default_server http2;
    index index.html;
    root /root/www/;
}


server {
    listen 127.0.0.1:6003 proxy_protocol;
    listen 127.0.0.1:6004 proxy_protocol http2;

    server_name your-domain.com;
    index index.html;
    root /root/www/;
}

server{
    if ($host = www.your-domain.com) {
        return 301 https://$host$request_uri;
    } # managed by Certbot


    if ($host = blog.your-domain.com) {
        return 301 https://$host$request_uri;
    } # managed by Certbot


    if ($host = your-domain.com) {
        return 301 https://$host$request_uri;
    } # managed by Certbot


    listen 80;
    server_name www.your-domain.com your-domain.com blog.your-domain.com;
    return 404; # managed by Certbot

}
重启xray及nginx服务
#重启xray
systemctl restart xray

#重启nginx
systemctl restart nginx
至此xray的搭建完成。
6.8 客户端v2rayN配置
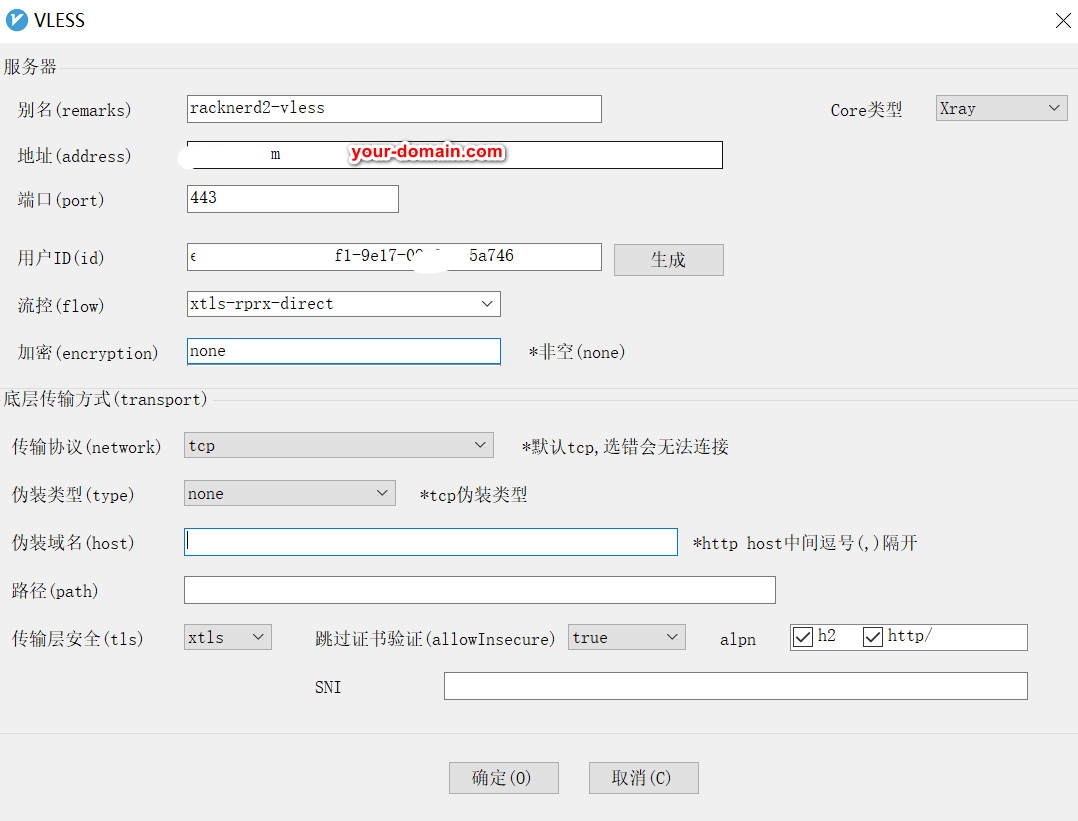
vless协议配置大体截图:
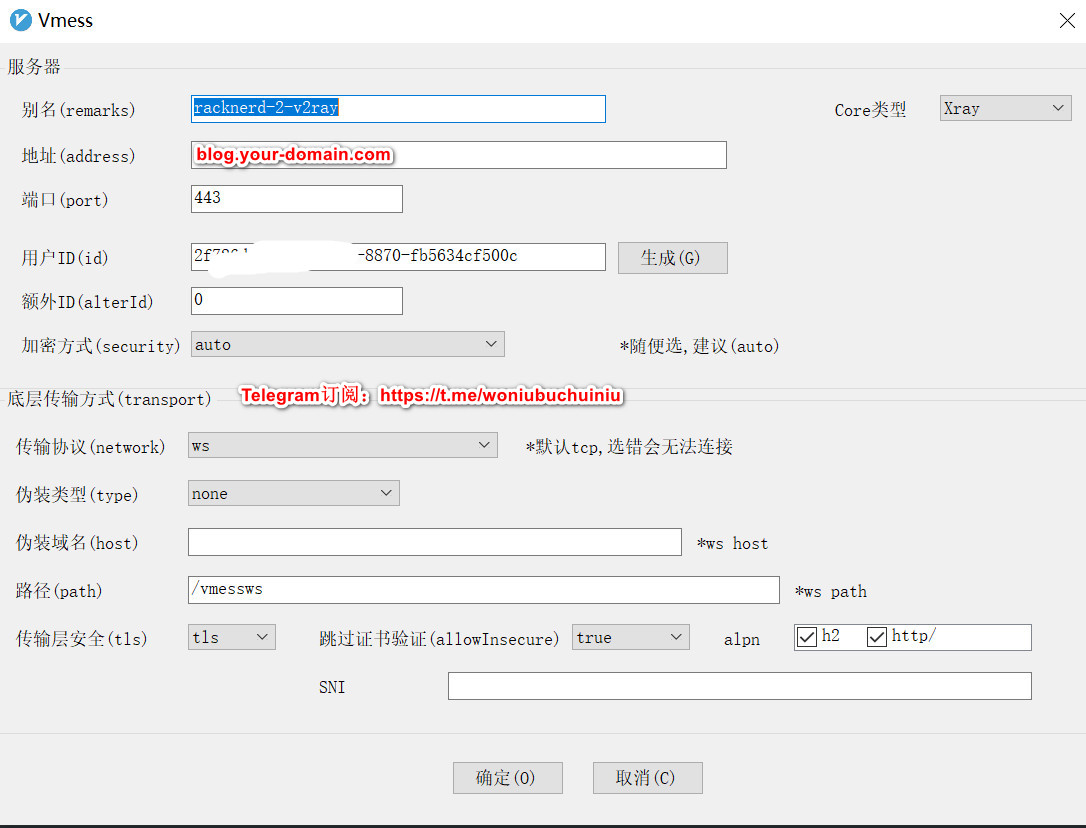
使用vmess协议链接的配置截图:
七、出现问题
7.1 Debian系统删除、回车不好用?
7.2 Cloudflare要不要启用CDN?
启用后比较慢,针对国内,作用可能会隐藏真实IP,除非IP被墙,大概率你是不需要启用的。
八、问题交流
在学习的过程中遇到任何问题都可以加入Telegram群组进行交流-> 加入群组。

最新评论
azgkf或777
磁力链接不对。下面这个链接才是的 magnet:?xt=urn:btih:73F98BFF1E8C4EE83A962FCF715D0A3120E1BB63
文件违规,根据相关法律法规要求,该文件已禁止访问
oppo手机,没有Didn't get the code按钮