


视频教程参考:Debian系统基于nginx搭建v2ray服务端配置vmess+tls+websocket详细教程。
篇首语:科学上网(fanqiang)的大体原理都是通过一台在防火墙之外的VPS作为媒介,实现国内网络和防火墙之外的网络之间的互通,因此一台不受防火墙骚扰的VPS是必备的。而v2ray负责的是你的网络和VPS之间的网络通信功能。借助V2ray你可以实现透过防火墙,自由穿梭于网络。你需要做的是分别在你的设备(手机、PC等)和VPS上分别部署一下V2ray。
搭建v2ray的步骤大体如下:
- 购买一个VPS,购买后你会获得VPS的IP、root用户及密码、SSH端口等信息;
- 登录VPS,可以借助
Xshell这个工具; - 安装v2ray,使用xshell成功登录VPS后,开始搭建;
- 在你的设备上配置与VPS对应的v2ray信息,就可以成功使用了;
在开始下面的搭建工作之前,请自行购买VPS并获得VPS的相关连接信息,保证能通过Xshell等远程连接工作连接后才能进行搭建,不论使用哪家的VPS,第一步是购买完VPS之后,获取到VPS的IP、root用户及密码、SSH端口等信息,本文主要说明搭建过程,因此这里将购买VPS及使用XSHELL进行连接的过程放在:史上最详细搬瓦工VPS注册/购买图文教程(内附优惠券) 。
正文开始之前,先插播个广告,推荐一些性价比较高的VPS,有购买VPS打算的,可以使用我的推介链接,这样你不仅可以优惠购买,我也会得到一定的返券,感谢你对我写文创作的支持!没有购买VPS打算的,可以跳过这一部分。
一、搬瓦工VPS推荐
速度、性价比都较好: 老牌商家,一分价钱一分货,套餐选择上肯定是越好的越贵,选择适合自己的,但从速度上来说,VPS 速度:香港线路 > CN2 GIA 线路 > CN2 线路 > 普通线路。搬瓦工优惠券: BWHNCXNVXV,此券为全网当前最高优惠力度:6.81%。
| 线路 | CPU | 内存 | 硬盘 | 带宽 | 流量 | 价格 | 购买链接 |
|---|---|---|---|---|---|---|---|
| CN2(推荐) | 1x Intel Xeon | 1024 MB | 20 GB SSD | 1 Gbps | 1 TB/月 | $49.99/年 | 购买 |
| CN2 GIA(特别推荐) | 2x Intel Xeon | 1 GB | 20GB SSD | 2.5 Gbps | 1000GB/月 | $169.99/年 | 购买 |
更多可选超高性价比套餐参见:VPS优惠推荐。
二、Rackerd VPS推荐
性价比较高: 提供大流量、大硬盘,支持PayPal、支付宝、微信等多种付款方式,电信走CN2 GT,联通直达机房(极佳),移动强制走联通链路,算是非CN2线路之外优化的相当不错的。
更多可选超高性价比套餐参见:VPS优惠推荐。
三、Vultr主机推荐
国外VPS Vultr云主机:最低每月$2.5,免费领取$3,低价注册使用教程:国外VPS Vultr云主机注册使用教程:最低每月$2.5,免费领取$3。
| 内存 | CPU | 硬盘 | 流量 | 价格 | 购买 |
|---|---|---|---|---|---|
| 0.5GB | 1核 | 10GB | 512GB/月 | $2.5/月 | 链接 |
| 0.5GB | 1核 | 10GB | 512GB/月 | $3.5/月 | 链接 |
| 1GB | 1核 | 25GB | 1TB/月 | $5/月 | 链接 |
| 2GB | 1核 | 55GB | 2TB/月 | $10/月 | 链接 |
更多可选超高性价比套餐参见:VPS优惠推荐。
下面再来通过图文,来详细说明上面的步骤。
四、环境信息
- 服务器系统:Debian GNU/Linux 10
- 服务端:v2ray-core v5.1.0;
- 客户端:v2rayN v5.38 ;
- VPS:我使用的是BandwagonHost 基本套餐 CN2 GIA,本博客也是在此VPS搭建。
五、搭建脚本说明
使用到的官网安装脚本:https://github.com/v2fly/fhs-install-v2ray,该脚本在执行时会提供info和error等信息,请仔细阅读。
六、开始搭建
提个醒:搭建的过程中难免会碰到一些错误和难题,每个人的服务器版本之类的都有区别,开始之前可以阅读一下我碰到的【七、搭建过程中常见问题汇总】,会更加节省时间。
6.1连接VPS
这篇文章里有使用xshell远程连接VPS的细节。
6.2更新
apt update
6.3安装curl
apt install curl
6.4安装v2ray
使用curl进行安装
bash <(curl -L https://raw.githubusercontent.com/v2fly/fhs-install-v2ray/master/install-release.sh)
输入vi /usr/local/etc/v2ray/config.json命令,编辑配置文件的内容为以下内容:
{
    "log": {
        "access": "/var/log/v2ray/access.log",
        "error": "/var/log/v2ray/error.log",
        "loglevel": "warning"
    },
    "inbounds": [{
            "port": 11055,
            "protocol": "vmess",
            "settings": {
                "clients": [{
                        "id": "27848739-7e62-4138-9fd3-098a63964b6b",
                        "level": 1,
                        "alterId": 0
                    }
                ]
            },
            "streamSettings": {
                "network": "ws",
                "wsSettings": {
                    "path": "/tech"
                }
            }
        }
    ],

    "outbounds": [{
            "protocol": "freedom"
        }
    ]
}
6.5 启动v2ray服务
启动并加入开机自启
systemctl start v2ray;systemctl enable v2ray
6.6 安装nginx
执行安装
apt install -y nginx
新建网页目录
这里在假设是/root/www。
mkdir -p /root/www
新建首页
在/root/www目录下新建一个index.html文件,
vi /root/www/index.html
内容如下:
<!doctype html>
<html lang="en">
<head>
    <meta charset="utf-8">
    <title>优米格-有事儿没事儿分享一下</title>
    <style>
        .container {
            width: 60%;
            margin: 10% auto 0;
            background-color: #f0f0f0;
            padding: 2% 5%;
            border-radius: 10px
        }

        ul {
            padding-left: 20px;
        }

        ul li {
            line-height: 2.3
        }

        a {
            color: #20a53a
        }
    </style>
</head>
<body>
<div class="container">
    <h1>感谢访问:</h1>
    <ul>
        <li>本站分享各类软件,方便大家获取使用!</li>
        <li>请勿请本站分享内容用来获利,大部分内容来自网络,凡是经本站分发的内容都经试用过,可放心安装!</li>
        <li>本站唯一网址:<a href="https://www.yomige.com/">https://www.yomige.com/</a>,谨防假冒!</li>
    </ul>
</div>
</body>
</html>
新建配置文件
注: 不同版本的nginx配置文件可能有区别,我的是nginx/1.18.0,配置文件/etc/nginx/sites-enabled/default。或者你的配置文件可能在/etc/nginx/conf.d/default.conf。
输入vi /etc/nginx/sites-enabled/default命令,编辑nginx配置文件为如下内容:
server{
    listen 80;
    server_name v1.xxxx.com;
    index index.html;
    root /root/www/;
}
这里你可能需要将
/etc/nginx/nginx.conf中第一行user www-data改为user root,即当前用户。
启动nginx服务
#启动Nginx并设置为开机自启
systemctl start nginx;systemctl enable nginx

#查看nginx启动状态
systemctl status nginx
在浏览器里访问v1.xxxx.com,如果正常则说明nginx配置没问题,这是是没有加密的,不带HTTPS的网址:http://v1.xxxx.com。
6.7 安装certbot并申请ssl证书
详细的申请证书流程参考: certbot instructions – Nginx on Debian 10 (buster)。具体如下:
安装certbot
apt install certbot python3-certbot-nginx
申请证书
运行certbot --nginx开始申请证书,如下:
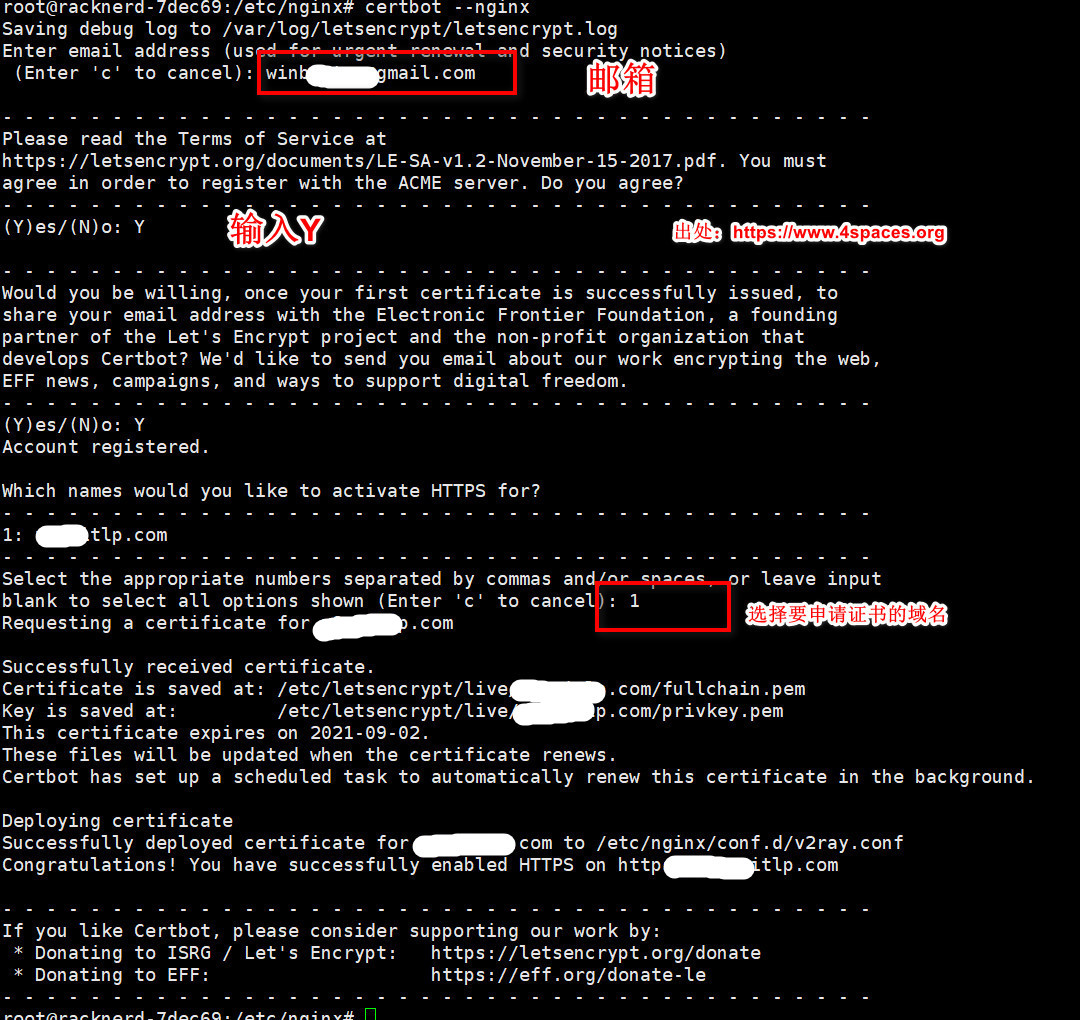
稍等一会,会提示证书安装成功! 你会发现nginx的配置已经更改,我的/etc/nginx/sites-enabled/default文件被自动修改为以下内容:
server{
    server_name v1.xxxx.com;
    index index.html;
    root /root/www/;

    listen 443 ssl; # managed by Certbot
    ssl_certificate /etc/letsencrypt/live/v1.xxxx.com/fullchain.pem; # managed by Certbot
    ssl_certificate_key /etc/letsencrypt/live/v1.xxxx.com/privkey.pem; # managed by Certbot
    include /etc/letsencrypt/options-ssl-nginx.conf; # managed by Certbot
    ssl_dhparam /etc/letsencrypt/ssl-dhparams.pem; # managed by Certbot

}
server{
    if ($host = v1.xxxx.com) {
        return 301 https://$host$request_uri;
    } # managed by Certbot


    listen 80;
    server_name v1.xxxx.com;
    return 404; # managed by Certbot


}
此时,在浏览器里访问v1.xxxx.com已经是https开头的了,地址:https://v1.xxxx.com。
6.8 添加v2ray转发
将/etc/nginx/sites-enabled/default更改为以下内容:
server{
    server_name v1.xxxx.com;
    index index.html;
    root /root/www/;

    listen 443 ssl; # managed by Certbot
    ssl_certificate /etc/letsencrypt/live/v1.xxxx.com/fullchain.pem; # managed by Certbot
    ssl_certificate_key /etc/letsencrypt/live/v1.xxxx.com/privkey.pem; # managed by Certbot
    include /etc/letsencrypt/options-ssl-nginx.conf; # managed by Certbot
    ssl_dhparam /etc/letsencrypt/ssl-dhparams.pem; # managed by Certbot

   ## 添加这部分内容,22055对应/usr/local/etc/v2ray/config.json 里面inbounds端口
   ## /tech客户端配置的时候需要,对应/usr/local/etc/v2ray/config.json streamSettings里的path
    location /tech {
        proxy_redirect off;
        proxy_pass http://127.0.0.1:11055;
        proxy_http_version 1.1;
        proxy_set_header Upgrade $http_upgrade;
        proxy_set_header Connection "upgrade";
        proxy_set_header Host $http_host;
    }
}
server{
    if ($host = v1.xxxx.com) {
        return 301 https://$host$request_uri;
    } # managed by Certbot


    listen 80;
    server_name v1.xxxx.com;
    return 404; # managed by Certbot


}
然后运行systemctl restart nginx重启nginx。
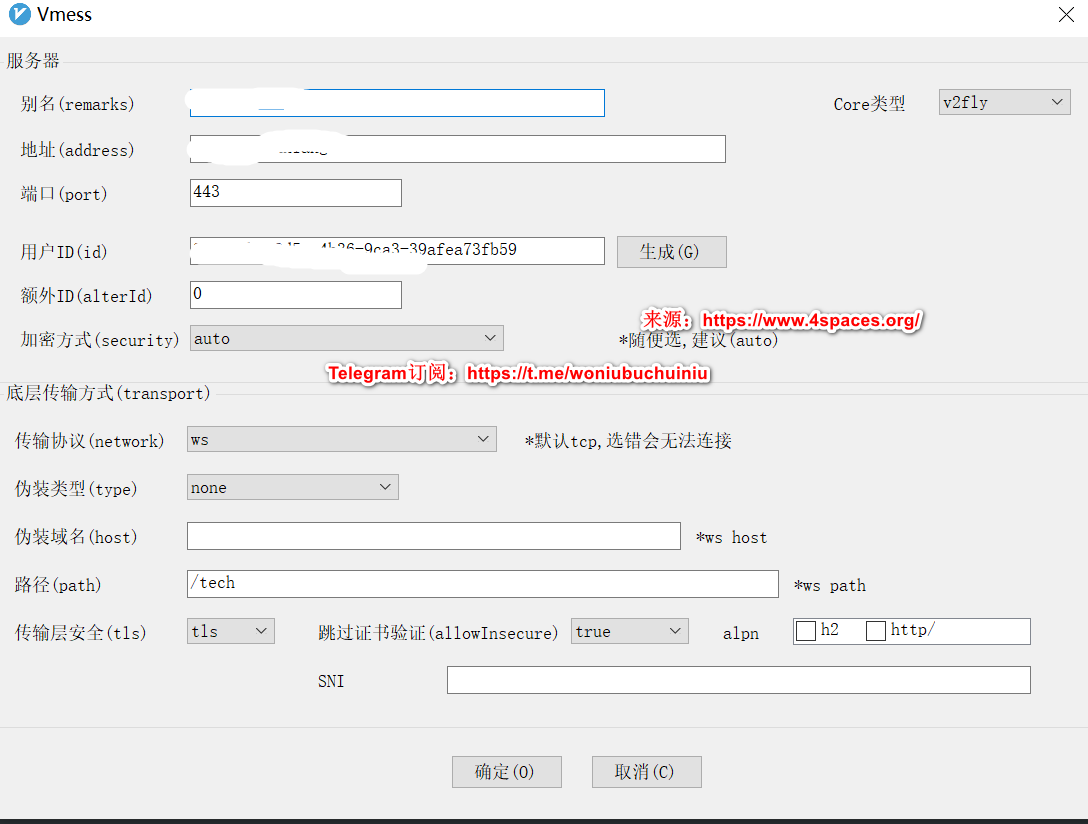
6.9 客户端v2rayN配置
大体截图:
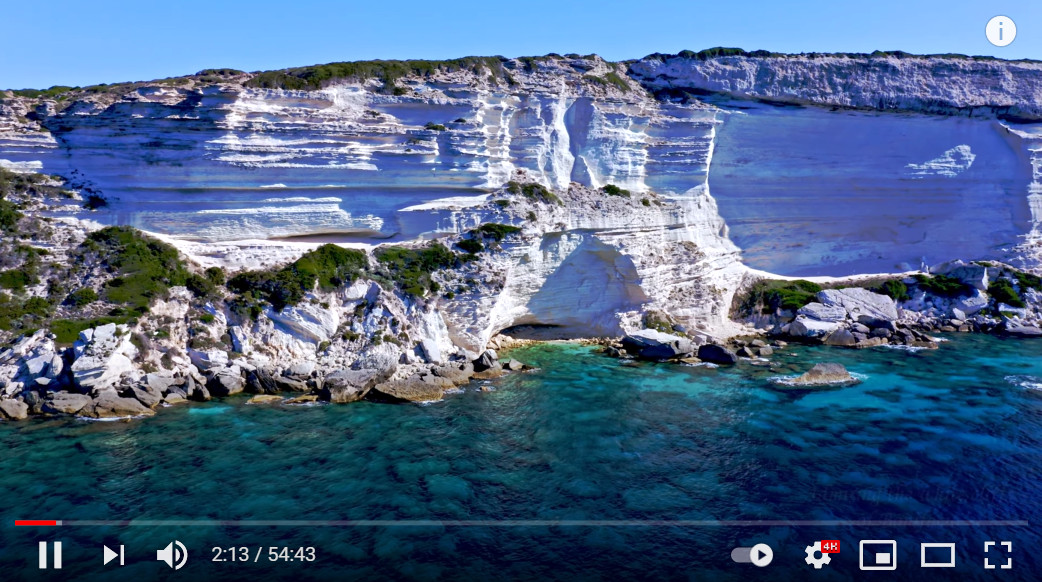
6.10 使用Google BBR开启加速
细节参考: Debian 9/10快速开启Google BBR实现v2ray高效单边加速。
观看Youtube 4k高清视频,播放速度还可以:
6.11 优化网络,隐藏真实IP
细节参考: 安装warp解决Google搜索出现人机验证、解锁Netfix非自制剧最新教程 。
七、卸载
执行脚本的卸载命令即可:
bash <(curl -L https://raw.githubusercontent.com/v2fly/fhs-install-v2ray/master/install-release.sh) --remove
八、 问题交流
- Telegram群组
在学习的过程中遇到任何问题都可以加入Telegram群组进行交流-> 加入群组。
- 邮件:
有问题您可以可以通过邮件进行沟通:欢迎联系。

卡在第4步了,请问怎么把打断命令粘贴进去
打断命令是什么
您好请问第四步到底应该输入什么啊,我把所有的东西都粘贴进去然后回车没反应。。不知道怎么搞
bash go.sh
感谢博主分享!一次就操作成功了
您好 想问下怎么配置多用户呢
请问一下 服务器的端口与v2ray配置文件得端口不是一个 设置端口应该用哪个
你是想问客户端的配置吗?客户端配置的是inbounds配置项有个port就是。
请问大神,unzip在哪里下载????我电脑没有,还不让选下载!!!
请问大神,unzip windows版在哪里下载????我电脑没有,还不让下载!!!
windows解压一般是7zip,winrar之类的吧
博主你好,,我刚使用yum install firewalld firewalld-config进行安装,然后执行了systemctl start firewalld 之后,就提示我could notconnect to我的IP了。能否帮忙解决下
能否ping通?是不是启用防火墙后端口未开放?
之前Netflix限制机房的ip,不知道现在能用么
很不错的文章,完全考虑到了新手。
我有一个疑问,更新脚本前,
v2ray/config.json的配置文件要不要删了
还是再安装一次它会自动覆盖v2ray/config.json文件?
博主想问一下
2020/05/25 21:45:43 tcp:127.0.0.1:4***5 accepted tcp:www.google.com.hk:80 [proxy]
这种是显示连接正确了吗?为什么我还是连不上Google…不知道什么原因
Using the webroot path /var/www/certbot for all unmatched domains.
Waiting for verification…
Challenge failed for domain xxxx.tk
http-01 challenge for xxxx.tk
Cleaning up challenges
Some challenges have failed.
IMPORTANT NOTES:
– The following errors were reported by the server:
Domain: xxxx.tk
Type: connection
Detail: Fetching
http://xxxx.tk/.well-known/acme-challenge/stiC6bFjWuRkZff_99Q5xcadE-SO7rr9_ef2e4XAP_M:
Connection reset by peer
To fix these errors, please make sure that your domain name was
entered correctly and the DNS A/AAAA record(s) for that domain
contain(s) the right IP address. Additionally, please check that
your computer has a publicly routable IP address and that no
firewalls are preventing the server from communicating with the
client. If you’re using the webroot plugin, you should also verify
that you are serving files from the webroot path you provided.
– Your account credentials have been saved in your Certbot
configuration directory at /etc/letsencrypt. You should make a
secure backup of this folder now. This configuration directory will
also contain certificates and private keys obtained by Certbot so
making regular backups of this folder is ideal.
v2ray 安装脚本安装不了了
老哥 有没有window server的教程
自由
搭建完毕还是无法上外网怎么弄啊,大神?
使用推荐的racknerd,申请证书前可行,一申请证书网页就打不开了
使用cloudflare了吗
用了, cloudflare域名解析好才开始搭建的
参考这个:https://www.4spaces.org/573.html
我这个现象好奇怪,第一次搭建好以后第二天就不能用了,网站突然打不开了,重装系统后一旦申请证书网站就无法打开,尝试多次都是一样的结果,无奈换了ip。
换好ip,重新搭建成功,又是第二天不能用了,网站打不开,重装系统卡在申请证书,申请后网站无法打开,尝试几次一样的结果,该怎么解决?
我有尝试更换cloudflare的子域名,甚至还申请了另一个域名,都崩了。。。。。。
博主,帮分析一下呗
哥,这个问题解决了吗,我的也是这样
我想问下电脑上可以连外网,安卓端却无法连上可以解决吗
这样描述没法判断
你好 安装完证书后 出现访问不了域名的情况 提示是重定向多次 一直访问不了网页 这是为什么啊?
参考这篇文章: https://www.4spaces.org/1514.html 第七部分
搭建好后,怎么导到安卓上用
复制配置信息,安卓上从粘贴板导入就行
感谢分享优质内容。
运行这个命令
certbot –nginx
报错如下,怎么解决啊
missing profile snap.certbot.certbot.
Please make sure that the snapd.apparmor service is enabled and started
出现了这个错误app/proxyman/outbound: failed to process outbound traffic > proxy/vmess/outbound: failed to find an available destination ……. common/retry: all retry attempts failed
那个错误服务器防火墙启用inbound端口就解决了喜喜🤣
成功了,文中6.9 客户端v2rayN配置中有点错误,
最后面 传输安全 不用选择,客户端就直接连上了。
最后连客户端的时候出现了如下问题, 请教博主如何解决?
app/proxyman/outbound: failed to process outbound traffic >
proxy/vmess/outbound: failed to find an available destination > common/retry: [transport/internet/websocket: failed to dial WebSocket >
transport/internet/websocket: failed to dial to (wss://a.xxx.xxx/tech): > dial tcp xxx.xxx.xxx.xxx:443: i/o timeout
请问在配置nginx的配置文件的域名,只有用你给的域名能访问,配置成自己的域名访问不了是什么原因呢
不可能吧,我给的域名是随便写的,都无法访问的
跟着这篇弄了一下午没弄成功,换了一篇https://www.4spaces.org/1073.html跟着弄就成功了,不知道什么道理。
Which names would you like to activate HTTPS for?
We recommend selecting either all domains, or all domains in a VirtualHost/server block.
– – – – – – – – – – – – – – – – – – – – – – – – – – – – – – – – – – – – – – – –
1: v1.xxxx.com
– – – – – – – – – – – – – – – – – – – – – – – – – – – – – – – – – – – – – – – –
Select the appropriate numbers separated by commas and/or spaces, or leave input
blank to select all options shown (Enter 'c' to cancel): 1
Requesting a certificate for v1.xxxx.com
Certbot failed to authenticate some domains (authenticator: nginx). The Certificate Authority reported these problems:
Domain: v1.xxxx.com
Type: unauthorized
Detail: 54.153.216.130: Invalid response from http://v1.xxxx.com/.well-known/acme-challenge/Fyyckp_TahijjbHU8C9EiDVXcOMv1ZilKhRKZt-BLUc: "<!DOCTYPE html>\n<!– Google tag (gtag.js) –>\n<script async src=\"https://www.googletagmanager.com/gtag/js?id=UA-223765-23\"></scr"
Hint: The Certificate Authority failed to verify the temporary nginx configuration changes made by Certbot. Ensure the listed domains point to this nginx server and that it is accessible from the internet.
Some challenges have failed.
域名是你自己的,文章里随便写的域名,需要替换。
是需要单独再申请个域名 然后把v1.xxxx.com替换掉吗
对
我能https访问了,但是就是代理不成功,我是按你的配置来的,包括客户端
请问你的问题解决了吗 我跟你一样
你好博主,根据你的配置,我做到第6.9步出现了 链接服务器一直是-1的问题,v2ray所有配置都是用了6.4里边的,address用域名是么?还是IP?我切换了域名和IP 都不行啊
坑人嘛,你这个config.json得监听127.0.0.1,不然根本接受不到数据